
【Maya C++】 C++を使ってset vertex colorのコマンド・プラグインを作ってみる【1日目】
こんにちはMaya Python Advent Calendar 2020の2日目の記事です
今回は C++を使ってset vertex colorのコマンド・プラグインを作ってみるといった記事になります 全部で2回の記事になる予定で、第1回目となります
作業環境
windows 10 Pro
software
visual studio2015(以後VS2015) maya2019 update2
Maya Developer Kit
Maya Developer Centerから各自ダウンロードしてください
VS2015での環境設定
VS2015に関しての環境設定はこちらから確認して設定してください
C++を使ってset vertex colorのコマンド・プラグインを作ってみる
コマンド・プラグインの作り方
コマンド・プラグインのクラスはMPxCommandクラスを継承して作っていくため、まずはMPxCommandクラスを継承したsetVertexColorを作ります
#include <maya\MPxCommand.h>
#include <maya\MArgList.h>

class setVertexColor : public MPxCommand
{
public:
    virtual MStatus doIt(const MArgList& args);
    static void *creator() { return new setVertexColor; }

};
次にコマンド定義を行います
MStatus initializePluign(MObject obj)MStatus uninitializePlugin(MObject obj
量関数はすべてのMayaプラグインで定義する必要があります、これがない場合はプラグインがリンクされませんのでおまじないのつもりでとりあえず定義してください
#include <maya\MPxCommand.h>
#include <maya\MArgList.h>
#include <maya\MFnPlugin.h>

//~~~~~~~~~~

MStatus initializePlugin(MObject obj)
{
    MFnPlugin plugin(obj, UnPySide, 1.0, Any);

    MStatus stat;
    stat = plugin.registerCommand(setVertexColor, setVertexColor::creator);
    if (!stat)
        stat.perror(registerCommand failed);
    return MS::kSuccess;
}

MStatus uninitializePlugin(MObject obj)
{
    MFnPlugin plugin(obj);

    MStatus stat;
    stat = plugin.deregisterCommand(setVertexColor);

    if (!stat)
        stat.perror(deregisterCommand failed);
    return MS::kSuccess;
}
initializePlugin関数 MStatus initializePlugin(MObject obj) はMObjectを入力と受け取り、プラグインタイプ用のMayaの内部データへのハンドルをするために使用します
MFnPlugin plugin(obj, "UnPySide", "1.0", "Any");ではMFnPluginオブジェクトが生成されobj変数を引数として初期化しています
MFnPluginをMObjectにアタッチさせることでMFnPlugin関数を呼び出してMObjectを操作することができます
MStatus stat;
stat = plugin.registerCommand(setVertexColor, setVertexColor::creator);
ここではsetVertexColorコマンドが登録されます。コマンドの登録を行うことでコマンドがmayaで使用できるようになり、登録には登録名とともにcreator関数を与える必要があります 登録名はそのコマンドを実行するときの名称で、この場合はsetVertexColorになります creator関数はstatic関数でコマンドのインスタンスを1つアロケートし、これはMayaを登録する際に必要なので忘れないように登録しましょう
if (!stat)
    stat.perror(deregisterCommand failed);
return MS::kSuccess;
この行では単純に登録の結果をチェックして、失敗していたらエラー
問題なければ次の行に行きMS::kSuccessを返します
もし返ってきたステータスがMS::kSuccessでなければプラグインは終了し、ダイナミックリンクライブラリは自動的にアンロードされ、コマンドラインの結果にエラーメッセージが表示されます
MStatus uninitializePlugin(MObject obj)ではその逆を行っています
もし返ってきたステータスがMS::kSuccessでなければプラグインはアンロードされません
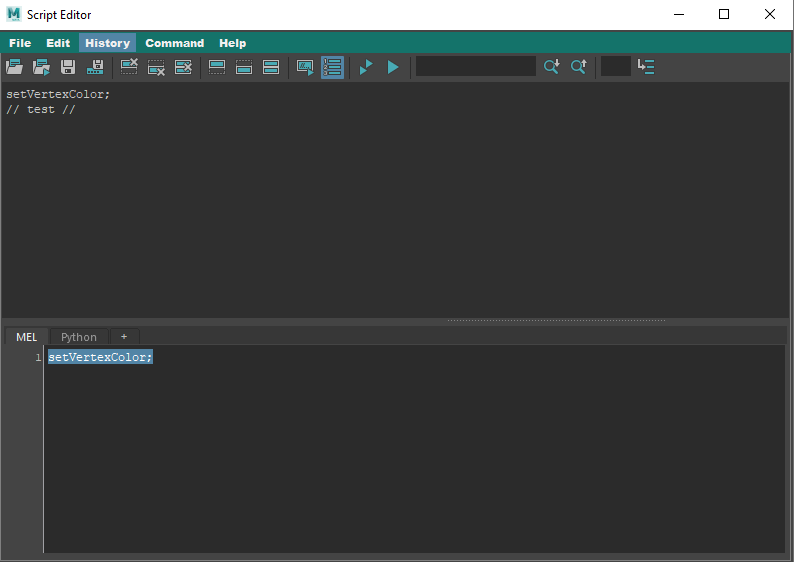
実際に実行できるか試してみたいので新しいコマンドクラスであるsetVertexColorに定義されているdoIt関数を実装します
MGlobal::displayInfo (const MString &theMessage)を使ってスクリプトエディタに情報メッセージを表示してみましょう
#include <maya\MPxCommand.h>
#include <maya\MFnPlugin.h>
#include <maya\MArgList.h>
#include <maya\MGlobal.h>

class setVertexColor : public MPxCommand
{
//~~~~~~~~~~
}

MStatus setVertexColor::doIt(const MArgList &args)
{
    char test[] = test;
    cout << test << endl;
    MGlobal::displayInfo(test);
    return MS::kSuccess;
}
//~~~~~~~~~~
作成した.mllをプラグインで読み取り実行すると下の画像のような結果が出るかと思います
doIt関数はバーチャル関数でコマンドが実行された場合に呼び出されます この関数はコマンドの実際の動作を行い、コマンドがすべき操作をすべて実行した後に結果を生成します ちなみに定義されているcreator関数はコマンドのインスタンスを生成するのに使用します
set vertex Color コマンド・プラグインを作る
さて、問題なく実行できたところでテストではなく実際のdoIt関数を組んでいきたいと思います
まず。MSelectionList.h, MDagPath.h, MItSelectionList.h, MFnMesh.h, MColor.h, MColorArray.hをインクルードします
#include <maya\MPxCommand.h>
#include <maya\MFnPlugin.h>
#include <maya\MArgList.h>
#include <maya\MGlobal.h>

#include <maya\MSelectionList.h>
#include <maya\MDagPath.h>
#include <maya\MItSelectionList.h>
#include <maya\MFnMesh.h>
#include <maya\MColor.h>
#include <maya\MColorArray.h>
次にdoIt関数を記述します
MStatus setVertexColor::doIt(const MArgList &args)
{
    MSelectionList selList;
    MGlobal::getActiveSelectionList(selList);
    MDagPath dagPath;
    MItSelectionList dag(selList);
    selList.getDagPath(0, dagPath);
    MFnMesh mesh(dagPath);
    MStringArray colorSetArray;
    mesh.getColorSetNames(colorSetArray);
    unsigned int size = colorSetArray.length();
    if (size == 0) {
        mesh.createColorSet(MString(colorSet));
        mesh.setCurrentColorSetName(MString(colorSet));
    }

    MItSelectionList iter(selList, MFn::kMesh);
    for (; !iter.isDone(); iter.next()) {
        iter.getDagPath(dagPath);
        MFnMesh meshFn;
        meshFn.setObject(dagPath);
        MFnDependencyNode dnFn = dagPath.node();

        MColorArray vertexColorList;
        meshFn.getVertexColors(vertexColorList);

        int LenVertexList = vertexColorList.length();
        vertexColorList.setLength(LenVertexList);

        MIntArray vertexIndexList;
        for (signed int count = 0; count < LenVertexList; count++) {
            vertexColorList.set(MColor(MColor::kRGB, 1.0, 0, 0, 1.0), count);
            vertexIndexList.append(count);
        }

        meshFn.setVertexColors(vertexColorList, vertexIndexList, 0, MFnMesh::MColorRepresentation::kRGB);
    }
    return MS::kSuccess;
}
現在選択されているオブジェクトがリストが作成されます selListはオブジェクトのリストを保有するために使用しています
MStatus setVertexColor::doIt(const MArgList &args)
{
    MSelectionList selList;
    MGlobal::getActiveSelectionList(selList);
getDagPathを使用して、選択しているDagPathとコンポーネントを取得し,MFnMeshからメッシュの情報を取得します
    MItSelectionList dag(selList);
    selList.getDagPath(0, dagPath);
    MFnMesh mesh(dagPath);
Meshに設定されているcolorSetをArrayで取得し、もしcolorSetがなければcreateColorSetで新しいカラーセット "colorSet" を作成し、作成したカラーセットをsetCurrentColorSetNameで現在のカラーセットに設定します
    MStringArray colorSetArray;
    mesh.getColorSetNames(colorSetArray);
    unsigned int size = colorSetArray.length();
    if (size == 0) {
        mesh.createColorSet(MString(colorSet));
        mesh.setCurrentColorSetName(MString(colorSet));
    }
次に選択されたオブジェクトのリストをループ処理します
これにはMItSelectionListオブジェクトを使用し、コマンドはタイプフィルタを指定しているためメッシュのみに有効になっています
MItSelectionList iter(selList, MFn::kMesh);メッシュを以下のループで処理しています イテレータはすべての選択したメッシュをループ処理します
for (; !iter.isDone(); iter.next()) {イテレータでループされたそれぞれからgetDagPathでmeshの情報を取得し、MObjectを取り出します
        iter.getDagPath(dagPath);
        MFnMesh meshFn;
        meshFn.setObject(dagPath);
        MFnDependencyNode dnFn = dagPath.node();
MColorArrayでMColorのデータ型の配列を用意し、getVertexColorsですべての Vertices vertexColorListに格納します。 LenVertexListでvertexColorListの長さを取得し、設定しておきます
        MColorArray vertexColorList;
        meshFn.getVertexColors(vertexColorList);

        int LenVertexList = vertexColorList.length();
        vertexColorList.setLength(LenVertexList);
MIntArrayで整数データ型の配列を用意します。 vertexColorListの数だけループさせます ループ内の処理はそれぞれのVertexColorListにMColorで設定したいカラー情報を設定し、先ほど用意したvertexIndexListに整数データの配列をappendしていきます
        MIntArray vertexIndexList;
        for (signed int count = 0; count < LenVertexList; count++) {
            vertexColorList.set(MColor(MColor::kRGB, 1.0, 0, 0, 1.0), count);
            vertexIndexList.append(count);
        }
setVertexColorsで先ほど用意したvertexColorListとvertexIndexListで頂点に色を設定します 結果が問題なければMS::kSuccessを返します
meshFn.setVertexColors(vertexColorList, vertexIndexList, 0, MFnMesh::MColorRepresentation::kRGB);
}
return MS::kSuccess;
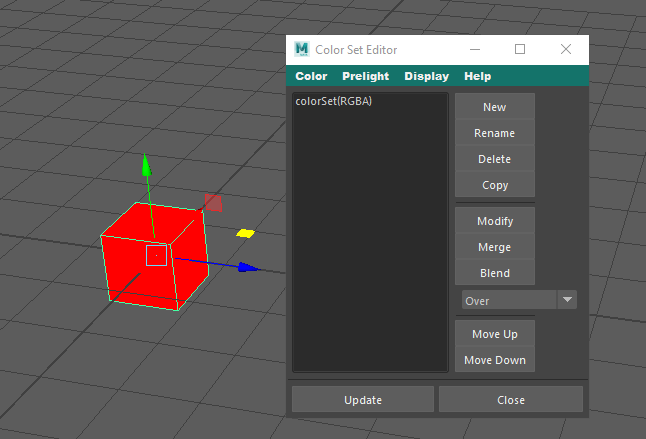
}コードを再度ビルドし、実行すると下の画像のように新しくcolorSetが作られ、赤一色の頂点カラーに塗られたメッシュが表示されるはずです
今回はここまでで次回はよりコマンドプラグインらしくしていきます
Maya Python Advent Calendar 2020の3日目の記事はshigehiroさんのRamp制御を含むGUIを作るです