【MayaPySide】ちょっとおしゃれなUIメソッド【3日目】
現在記事の修正中です
こんにちはMayaPython Advent Calendar 2017の15日目の記事です
全記事一覧です
【MayaPySide】ちょっとおしゃれなUIメソッド【1日目】
【MayaPySide】ちょっとおしゃれなUIメソッド【2日目】
【MayaPySide】ちょっとおしゃれなUIメソッド【3日目】
はい!本日はなんと特別なことがあります!
そう、それは
誕生日!!!
たくさんのプレゼント!!待ってます!!!
5000兆円とか!!!
ということで、ちょっとおしゃれなUIメソッドの三日目です。最終となります。
かなり量が多いので頑張っていきましょう!
#!/usr/bin/env python
# -*- coding: utf-8 -*-
import re
import os
import sys

import maya.cmds as cmds
import pymel.core as pm
from maya import OpenMayaUI

from Qt.QtWidgets import *
from Qt.QtGui import *
from Qt.QtCore import *

try:
    import shiboken
except:
    import shiboken2 as shiboken

ptr = OpenMayaUI.MQtUtil.mainWindow()
parent = shiboken.wrapInstance(long(ptr), QWidget)

class maskUI(QMainWindow):
    def __init__(self):
        super(maskUI, self).__init__(parent)

    def PaletteUI(self):
        setColors = ['#54354e', '#6a86c7']
        Palette = QPalette()
        gradient = QLinearGradient(QRectF(
                self.rect()).topLeft(),
                QRectF(self.rect()).topRight()
            )
        gradient.setColorAt(0.0, setColors[0])
        gradient.setColorAt(1.0, setColors[1])
        Palette.setBrush(QPalette.Background, QBrush(gradient))

        path = QPainterPath()
        path.addRoundedRect(self.rect(), 3, 3)
        region = QRegion(path.toFillPolygon().toPolygon())

        self.setMask(region)
        self.setPalette(Palette)

class setMainWindow(maskUI):
    def __init__(self):
        super(setMainWindow, self).__init__()
        self.installEventFilter(self)
        self.resize_mode = None

    def mouseReleaseEvent(self, pos):
        self.mc_x = pos.x()
        self.mc_y = pos.y()

    def mousePressEvent(self, pos):
        self.mc_x = pos.x()
        self.mc_y = pos.y()
        borderWidth = 8
        resizeWidth = self.minimumWidth() != self.maximumWidth()
        resizeHeight = self.minimumHeight() != self.maximumHeight()

        self.pre_size_x = self.size().width()
        self.pre_size_y = self.size().height()
        self.size_w = self.size().width()
        self.size_h = self.size().height()
        self.sub_w = self.size_w - self.mc_x
        self.sub_h = self.size_h - self.mc_y
        resize_mode = None

        if resizeWidth is True:
            if self.mc_x < borderWidth:
                resize_mode = "left"
            if self.sub_w < borderWidth:
                resize_mode = "right"

        if resizeHeight is True:
            if self.mc_y < borderWidth:
                resize_mode = "top"

            if self.sub_h < borderWidth:
                resize_mode = "bottom"

        if resizeWidth is True and resizeHeight is True:
            if self.mc_x <= borderWidth and self.mc_y <= borderWidth:
                resize_mode = 'top_left'
            if self.sub_w <= borderWidth and self.sub_h <= borderWidth:
                resize_mode = 'bottom_right'
            if self.sub_w <= borderWidth and self.mc_y <= borderWidth:
                resize_mode = 'top_right'
            if self.mc_x <= borderWidth and self.sub_h <= borderWidth:
                resize_mode = 'bottom_left'
            if self.mc_x >= borderWidth and self.mc_y >= borderWidth\
                and self.sub_w >= borderWidth\
                    and self.sub_h >= borderWidth:
                resize_mode = 'center'

        self.resize_mode = resize_mode
        return self.resize_mode

    def eventFilter(self, obj, event):
        if event.type() == QEvent.Type.Enter:
            QApplication.setOverrideCursor(Qt.ArrowCursor)
            return True
        if event.type() == QEvent.Type.HoverMove:
            pos = event.pos()
            cur_dict = {
                'right': Qt.SizeHorCursor,
                'left': Qt.SizeHorCursor,
                'top': Qt.SizeVerCursor,
                'bottom': Qt.SizeVerCursor,
                'top_left': Qt.SizeFDiagCursor,
                'bottom_right': Qt.SizeFDiagCursor,
                'top_right': Qt.SizeBDiagCursor,
                'bottom_left': Qt.SizeBDiagCursor,
                'center': Qt.ArrowCursor,
                None: Qt.ArrowCursor
                }
            cur = cur_dict[self.resize_mode]
            current_cur = QApplication.overrideCursor().shape()
            cur_set = cur_dict[self.resize_mode]
            if cur != current_cur:
                QApplication.changeOverrideCursor(cur_set)
                return True
            return True

        if event.type() == QEvent.Type.Leave:
            QApplication.restoreOverrideCursor()
            return True
        else:
            return False

    def mouseMoveEvent(self, pos):
        self.PaletteUI()
        self.win_x = pos.globalX() - self.mc_x
        self.win_y = pos.globalY() - self.mc_y

        if self.resize_mode is None:
            self.resize_mode = 'center'

        if self.resize_mode is 'center':
            self.move(self.win_x, self.win_y)

        else:
            self.re_w = self.size().width()
            self.re_h = self.size().height()
            if 'right' in self.resize_mode:
                self.re_w = pos.x() + self.sub_w
                self.resize(self.re_w, self.re_h)

            if 'bottom' in self.resize_mode:
                self.re_h = pos.y() + self.sub_h
                self.resize(self.re_w, self.re_h)

            if 'left' in self.resize_mode:
                self.resub_w = pos.x() - self.mc_x
                self.re_w = self.re_w - self.resub_w
                self.resize(self.re_w, self.re_h)
                if self.size().width() != self.pre_size_x:
                    self.win_x = pos.globalX() - self.mc_x
                    self.move(self.win_x, self.pos().y())
                self.pre_size_x = self.size().width()

            if 'top' in self.resize_mode:
                self.resub_h = pos.y() - self.mc_y
                self.re_h = self.re_h - self.resub_h
                self.resize(self.re_w, self.re_h)
                if self.size().height() != self.pre_size_y:
                    self.win_y = pos.globalY() - self.mc_y
                    self.move(self.pos().x(), self.win_y)
                self.pre_size_y = self.size().height()

class SysButton(QPushButton):
    closed = Signal()

    def __init__(self):
        super(SysButton, self).__init__()
        self.clicked.connect(self.__closed)

    def __closed(self):
        self.closed.emit()

class MainWidget(QWidget):
    closed = Signal()

    def __init__(self):
        super(MainWidget, self).__init__()

        self.sysButton = SysButton()
        self.sysButton.setText('Close')
        self.sysButton.closed.connect(self.__close)

        self.mainLayout = QVBoxLayout(self)

        self.mainLayout.addWidget(self.sysButton)
        self.mainLayout.addStretch(True)

    def __close(self):
        self.closed.emit()

class Example(setMainWindow):
    def __init__(self):
        super(Example, self).__init__()
        self.initUI()
        self.setWidget()
        self.PaletteUI()

    def initUI(self):
        self.setWindowOpacity(0.85)
        self.setGeometry(300, 300, 200, 150)
        self.setWindowFlags(Qt.Window | Qt.FramelessWindowHint)

    def setWidget(self):
        mainWidget = MainWidget()
        mainWidget.closed.connect(self.gui_Close)
        self.setCentralWidget(mainWidget)

    def gui_Close(self):
        self.timer = QTimer()
        self.timer.setInterval(600)
        self.timer.timeout.connect(self.close)
        self.timer.start()
        self.fade = QPropertyAnimation(self, "windowOpacity")
        self.fade.setStartValue(0.85)
        self.fade.setEndValue(0.0)
        self.fade.setKeyValueAt(0.5, 0.0)
        self.fade.setEasingCurve(QEasingCurve.InOutCubic)
        self.fade.setDuration(600)
        self.fade.start()

    def paletteUI(self):
        setColors = ['#54354e', '#6a86c7']

        Palette = QPalette()
        gradient = QLinearGradient(QRectF(
                self.rect()).topLeft(),
                QRectF(self.rect()).topRight()
            )
        gradient.setColorAt(0.0, setColors[0])
        gradient.setColorAt(1.0, setColors[1])
        Palette.setBrush(QPalette.Background, QBrush(gradient))
        self.setPalette(Palette)

        path = QPainterPath()
        path.addRoundedRect(self.rect(), 10, 10)
        region = QRegion(path.toFillPolygon().toPolygon())
        self.setMask(region)

def Example_UI():
    global Example_UI_ex
    app = QApplication.instance()
    Example_UI_ex = Example()
    Example_UI_ex.show()
    sys.exit()
    app.exec_()

Example_UI()
上に記述している前回までのコードをコピーして使用してください。
下の表のようなフォルダファイル構成を作っていきます。
C:\Users\<ユーザー名>\Documents\maya\scripts\Index
├── __init__.py/
├── example.py
└── resource/
| ├── < imageName >.png
| └── < imageName >.png
Index直下には今まで作成してきたソースコードを
Example.py
という名前で保存します。
一番最後にあるExample_UI()は消しておきます
一度うまくmaya読み込めるか、以下のコードを実行してみましょう
import Index.Example as IE
IE.Example_UI()
import Index.Example as IEの後にreload(IE)を記述するとモジュールをリロードできます
さて、今回の記事で作っていくものはメインのスライダー
そして6つのボタン、closeボタンとなります。
それらを作っていくにはまず必要なイメージ画像を用意します
今回、私が使用している画像のサイズはこのような構成になっています
| 画像の種類 | サイズ |
|---|---|
| Closeボタン用の画像 | 12x12px |
| スライダー用の画像 | 24x24px |
| その他6種類のボタン | 32x32px |
6種類のボタンのサイズが大きいサイズなのはあまり気にしないでください
もともと大きいサイズでボタンを構成していた名残です
また、データは基本pngを使用しています

このリンクからDLして使用してください
DLして解凍した画像をIndex/resourceに入れて下さい
次にその画像をQRCを作成し.pyに変換して読み込んでいきます
通常であればDesignerのリソースブラウザで画像を読み込んで~うんたらかんたらとしなければならないのですが
KIWAMIDENさんが便利なScriptを用意してくださっているのでぜひ活用してみてください
resource.pyをうまく作れましたら
Index直下にresource.pyを移動させてください
それでは画像を設定していきます
try:
    import shiboken
except:
    import shiboken2 as shiboken

import Index.resource

ptr = OpenMayaUI.MQtUtil.mainWindow()
parent = shiboken.wrapInstance(long(ptr), QWidget)

# ~~~~~~~~~~~~~~~~~~~~~~~~~~~~~~~~~~~~

class SysButton(QPushButton):
    closed = Signal()

    def __init__(self, *args, **kwargs):
        super(SysButton, self).__init__(*args, **kwargs)
        self.clicked.connect(self.__closed)

    def __closed(self):
        self.closed.emit()

class MainWidget(QWidget):
    closed = Signal()

    def __init__(self):
        super(MainWidget, self).__init__()
        self.clsBtn_UI()

    def clsBtn_UI(self):
        self.clsBtn = SysButton(self)
        self.clsBtn.setIcon(QIcon(":/resource/close.png"))
        self.clsBtn.setIconSize(QSize(14, 14))
        self.clsBtn.clicked.connect(self.__close)
        self.clsBtn.move(236, 10)

    def __close(self):
        self.closed.emit()

class Example(setMainWindow):
# ~~~~~~~~~~~~~~~~~~~~~~~~~~~~~~~~~~~~
    def initUI(self):
        self.setWindowOpacity(0.85)
        self.setGeometry(300, 300, 260, 100)
create_qrc.pyとcreate_qrc.batをexample.pyと同じ階層に作成して、以下のコードのようにしてください
import Index.resourceでresource.pyを読み込みます
class SysButton(QPushButton):に*args, **kwargsを記述します
これがあるとエラーなくうまくSysButtonを読み込むことができるようになります
そしてclass MainWidget(QWidget):のclsBtn以前はQVBoxLayoutを使って配置していましたが
直接位置をしたいため内容を変更しました
setIcon(QIcon(":/resource/close.png"))でiconを読み込むことができます
moveの位置が設定したサイズより大きいため
class Example(setMainWindow):のsetGeometry(300, 300, 260, 100)に変更します

実行するとうまく画像が読み込めていると思います
しかしこれでは意図したものになっていません
イメージは画像をボタンにするからです
そこで使うのがQSSです
QSSは所謂HTMLなどWebでよく使われているCSSによく似たようなものと思ってもらえばいいと思います
Index直下にstyle.qssというものを用意してください
以下のコードを記述して保存してください
QPushButton#Mask{
  border-style:none;
}
border-styleプロパティは、上下左右のボーダーのスタイルをまとめて指定する際に使用します
今回はborder-styleを使用しないnoneを設定します
border-styleについての詳細はCSS3 Draft Specification for details.を読むといいです
CSSとQSSは違いますが似ているものもありとても参考になります
異なる点では例えばborderをまとめて指定する場合
太さ・スタイル・色の順番に指定しないと無視されます
次に、style.qssをExample.pyで読み込めるようにdef Example_UI():の内容を変更します
ついでに二つ起動しないようにcloseの設定もします
def Example_UI():
    global Example_UI_ex
    dirname = os.path.dirname(__file__)
    try:
        Example_UI_ex.close()
        del Example_UI_ex
    except:
        pass
    try:
        styleFile = os.path.join(dirname, 'style.qss')
        with open(styleFile, 'r') as f:
            style = f.read()
    except:
        style = ''
        print styleFile

    app = QApplication.instance()
    app.setStyleSheet(style)

    Example_UI_ex = Example()
    Example_UI_ex.show()
    sys.exit()
    app.exec_()
しかし、このまま実行してもうまく画像を読むことができません
先ほど保存したqssに#Maskという文字が記述されていますがこれはObjectNameを設定しているもので
setObjectNameで名前を指定しないと読み込んでくれません。
clsBtnにsetObjectNameを設定し、実行してみます
def clsBtn_UI(self):
    self.clsBtn = SysButton(self)
    self.clsBtn.setIcon(QIcon(":/resource/close.png"))
    self.clsBtn.setIconSize(QSize(14, 14))
    self.clsBtn.setObjectName('Mask')
    self.clsBtn.clicked.connect(self.__close)
    self.clsBtn.move(236, 10)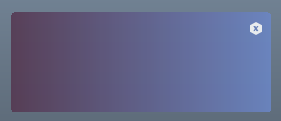
これでうまく画像だけのボタンを作ることができました
次にQLabelを設定します
QLabel#Header {
  font-family: Cast Iron Condensed;
  font-size: 30px;
  color: #fff1e6;
}
class MainWidget(QWidget):
closed = Signal()
def __init__(self):
super(MainWidget, self).__init__()
self.initUI()
self.clsBtn_UI()
def initUI(self):
self.text = QLabel("Darken", self)
self.text.move(8, 10)
self.text.setObjectName("Header")
fontはCast Iron Condensedを使用していますが好きなものに設定してください
font-sizeプロパティは、フォントのサイズを指定する際に使用します
colorプロパティは、カラーを指定する際に使用します
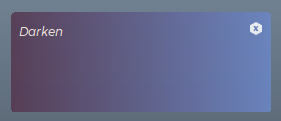
うまくテキストが表示されたでしょうか
次に6つのボタンを用意していくのですが
このボタンには右と左クリックを認識するように設定します
まず右と左を認識することができるクラスを用意します
class cCMRPushButton(QPushButton):
    Click = Signal()

    def __init__(self, string, *args, **kwargs):
        super(cCMRPushButton, self).__init__(string, *args, **kwargs)

    def mousePressEvent(self, event):
        QPushButton.mousePressEvent(self, event)
        if event.button() == Qt.RightButton:
            return
        elif event.button() == Qt.LeftButton:
            return
例のごとく、mousePressEventを使い右のクリックか左のクリックか認識できるように設定します
次にcCMRPushButtonを6つ用意します
左クリックを認識させるにはsetContextMenuPolicyが必要です、そしてcustomContextMenuRequested.connectでシグナルをコネクトします
今回は何が今押されているかをプリントする機能を用意します
def initUI(self):
    self.text = QLabel("Darken", self)
    self.text.move(8, 10)
    self.text.setObjectName("Header")

    Mtl_text = ["Btn_(0)", "Btn_(1)", "Btn_(2)", "Btn_(3)",
                "Btn_(4)", "Btn_(5)"]
    Mtl_num = int(len(Mtl_text))
    self.Mtl_Btns = []

    for i in range(Mtl_num):
        self.Mtl_Btns.append(cCMRPushButton(self))
        self.Mtl_Btns[i].setContextMenuPolicy(Qt.CustomContextMenu)
        self.Mtl_Btns[i].setIcon(
            QIcon(":/resource/%s.png" % (Mtl_text[i]))
            )
        self.Mtl_Btns[i].move(38 + i * 32, 76)
        self.Mtl_Btns[i].setObjectName('Mask')
        self.Mtl_Btns[i].clicked.connect(self.push_right)
        self.Mtl_Btns[i].customContextMenuRequested.connect(
            self.push_left
            )

def push_right(self):
    sender = self.sender()
    if sender is self.Mtl_Btns[0]:
        print "Mtl_Btns[0] -right"
    elif sender is self.Mtl_Btns[1]:
        print "Mtl_Btns[1] -right"
    elif sender is self.Mtl_Btns[2]:
        print "Mtl_Btns[2] -right"
    elif sender is self.Mtl_Btns[3]:
        print "Mtl_Btns[3] -right"
    elif sender is self.Mtl_Btns[4]:
        print "Mtl_Btns[4] -right"
    elif sender is self.Mtl_Btns[5]:
        print "Mtl_Btns[5] -right"

def push_left(self):
    sender = self.sender()
    if sender is self.Mtl_Btns[0]:
        print "Mtl_Btns[0] -left"
    elif sender is self.Mtl_Btns[1]:
        print "Mtl_Btns[1] -left"
    elif sender is self.Mtl_Btns[2]:
        print "Mtl_Btns[2] -left"
    elif sender is self.Mtl_Btns[3]:
        print "Mtl_Btns[3] -left"
    elif sender is self.Mtl_Btns[4]:
        print "Mtl_Btns[4] -left"
    elif sender is self.Mtl_Btns[5]:
        print "Mtl_Btns[5] -left"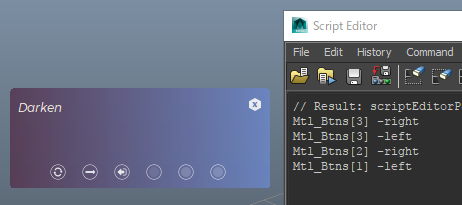
うまくいくと右クリックを押したときにどのボタンが押されたかをScriptEditorで結果が出てきます
さて、ここまででqssを使ったボタンの作成やclassを使って新しいボタンの作成をしてきました
次はこれまでしてきたことを応用してスライダーを作っていきます
実はこの画像にあるスライダーはQSliderだけを使って構成しているのではなく
組み合わせて表現しています
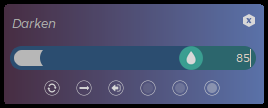
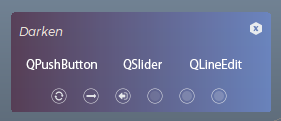
このスライダーの構成はQSlider、QPushButton、QLineEditです。
配置イメージはこうなります
ではまずQPushuButtonの新しいクラスを設定します
QPushButton#ColorButton{
  border-style: solid;
  border-radius: 12px;
  border-width: 4px;
  border-color: #335b84;
  height: 16px;
}
class ColorButton(QPushButton):
colorChanged = Signal(QColor)
def __init__(self, *args, **kwargs):
super(ColorButton, self).__init__(*args, **kwargs)
self.setFlat(True)
self.clicked.connect(self.showDialog)
self.__color = QColor(255, 255, 255)
self.__update()
self.setObjectName("ColorButton")
def showDialog(self):
color = QColorDialog.getColor(self.__color)
if not color.isValid():
return
self.__color = color
self.__update()
self.colorChanged.emit(self.__color)
def __update(self):
r, g, b, a = self.__color.getRgb()
self.setStyleSheet(
"""*{
background:rgb(%s, %s, %s);
}
""" % (r, g, b)
)
def color(self):
return self.__color
def setColor(self, color):
self.__color = color
self.__update()
self.colorChanged.emit(self.__color)
def rgba(self):
return self.__color.getRgb()
def setRgba(self, r, g, b, a=255):
self.__color.setRgb(r, g, b, a)
self.__update()
self.colorChanged.emit(self.__color)
def hsv(self):
return self.__color.getHsv()
def setHsv(self, h, s, v, a=255):
self.__color.setHsv(h, s, v, a)
self.__update()
self.colorChanged.emit(self.__color)
このColorButtonはスライダーが動いた際に色が変更したり、このボタンから色を選択することができます
実はKIWAMIDENさんのPySideでcolorSliderGrpモドキを作る方法をベースに作成しています
詳細はKIWAMIDENさんの記事を読むとよくわかるかと思います。
それぞれを設定していきます
以下のコードを追記してください
QSlider#Slider{
  border-color:  qlineargradient(
    x1: 0, y1: 0, x2: 2, y2: 0, stop: 0 #335b84, stop: 1 #347881
    );
  border-radius: 24px;
}
QSlider::groove:horizontal#Slider{
  height: 24px;
  border-radius: 24px;
  margin: 0 0.5px;
}

QSlider::handle:horizontal#Slider{
  width: 24px;
  height: 24px;
  background-image: url(:/resource/handle.png)
}

QSlider::add-page:qlineargradient#Slider{
  background: #347881;
  border-top-right-radius: 12px;
  border-bottom-right-radius: 12px;
  border-top-left-radius: 0px;
  border-bottom-left-radius: 0px;
}

QSlider::sub-page:qlineargradient#Slider{
  background: #335b84;
  border-top-right-radius: 0px;
  border-bottom-right-radius: 0px;
  border-top-left-radius: 12px;
  border-bottom-left-radius: 12px;
}

QLineEdit#Line{
  font-family: Montserrat;
  font-style: Bold;
  background: #347881;
  border-color: #347881;
  border-radius: 12px;
  color: #fff1e6;
  width: 58px;
  height: 24px;
}
class MainWidget(QWidget):
SliderValueChanged = Signal(int)
closed = Signal()
def __init__(self):
# ~~~~~~~~~~~~~~~~~~~~~~~~~~~~~~~~~~~~~~~~~~~~~~~~~~~~~~~~~~~~~~~
def initUI(self):
Mtl_Slider_P = 42
self.clrBtn = ColorButton(self)
self.clrBtn.setMinimumWidth(70)
self.clrBtn.setMinimumHeight(10)
self.clrBtn.colorChanged[QColor].connect(self.emitInt)
# ~~~~~~~~~~~~~~~~~~~~~~~~~~~~~~~~~~~~~~~~~~~~~~~~~~~~~~~~~~~~~~~
self.resultText = QLineEdit(self)
self.resultText.setFrame(False)
self.resultText.setAlignment(Qt.AlignRight)
self.resultText.setObjectName('Line')
self.resultText.setTextMargins(0, 0, 2, 1)
# ~~~~~~~~~~~~~~~~~~~~~~~~~~~~~~~~~~~~~~~~~~~~~~~~~~
self.sld = QSlider(Qt.Horizontal, self)
self.sld.valueChanged[int].connect(self.emitInt)
self.sld.setRange(0, 100)
self.sld.setValue(85)
self.sld.setObjectName('Slider')
self.resultText.move(194, Mtl_Slider_P)
self.sld.setGeometry(36, Mtl_Slider_P, 188, 25)
self.clrBtn.move(6, Mtl_Slider_P)
def emitInt(self, value):
try:
value = int(round(value.value() / 2.55))
colorsvalue = value
except:
pass
self.resultText.setText("%s" % (self.sld.value()))
value = int(value * 2.55)
sender = self.sender()
if sender == self.clrBtn:
color = self.clrBtn.color()
self.sld.blockSignals(True)
self.sld.setValue(color.value())
self.sld.blockSignals(False)
self.resultText.setText("%s" % (colorsvalue))
self.sld.setValue(colorsvalue)
elif sender == self.sld:
hsv = self.clrBtn.hsv()
self.clrBtn.blockSignals(True)
self.clrBtn.setHsv(hsv[0], hsv[1], value)
self.clrBtn.blockSignals(False)
return self.sld.value()
def output(self):
try:
num = int(self.resultText.text())
return num
except:
return "Text wasn't numeral."emitInt(self)
スライダーの値を変更し、ボタンの色を変更したりする機能です
output(self)
今現在のテキスト返す機能です
PushBtnにそれぞれ出力できるようにoutputをセットしていきます
def push_right(self):
    sender = self.sender()
    if sender is self.Mtl_Btns[0]:
        print "Mtl_Btns[0] -right\nValue: %s" % self.output()
    elif sender is self.Mtl_Btns[1]:
        print "Mtl_Btns[1] -right\nValue: %s" % self.output()
    elif sender is self.Mtl_Btns[2]:
        print "Mtl_Btns[2] -right\nValue: %s" % self.output()
    elif sender is self.Mtl_Btns[3]:
        print "Mtl_Btns[3] -right\nValue: %s" % self.output()
    elif sender is self.Mtl_Btns[4]:
        print "Mtl_Btns[4] -right\nValue: %s" % self.output()
    elif sender is self.Mtl_Btns[5]:
        print "Mtl_Btns[5] -right\nValue: %s" % self.output()

def push_left(self):
    sender = self.sender()
    if sender is self.Mtl_Btns[0]:
        print "Mtl_Btns[0] -left\nValue: %s" % self.output()
    elif sender is self.Mtl_Btns[1]:
        print "Mtl_Btns[1] -left\nValue: %s" % self.output()
    elif sender is self.Mtl_Btns[2]:
        print "Mtl_Btns[2] -left\nValue: %s" % self.output()
    elif sender is self.Mtl_Btns[3]:
        print "Mtl_Btns[3] -left\nValue: %s" % self.output()
    elif sender is self.Mtl_Btns[4]:
        print "Mtl_Btns[4] -left\nValue: %s" % self.output()
    elif sender is self.Mtl_Btns[5]:
        print "Mtl_Btns[5] -left\nValue: %s" % self.output()
MayaPython Advent Calendar 2017の16日目の記事はsho7nokaさんのprint デバッグから卒業したい人のための Maya+PyCharmです