イメージをマスクして丸縁のイメージを作る
 皆さんはUIを作成するときに画像を基に丸いアイコンのようなものを作成したいことはありませんか?
今回はそれを実現するための方法を紹介したいと思います
皆さんはUIを作成するときに画像を基に丸いアイコンのようなものを作成したいことはありませんか?
今回はそれを実現するための方法を紹介したいと思います
# -*- coding: utf-8 -*-
import sys
from PySide2.QtGui import*
from PySide2.QtCore import*
from PySide2.QtWidgets import*
from maya import OpenMayaUI
try:
import shiboken
except:
import shiboken2 as shiboken
ptr = OpenMayaUI.MQtUtil.mainWindow()
parent = shiboken.wrapInstance(long(ptr), QWidget)
def maskImage(
imgPath=None, imgData=None, imgType=png, size=200,
noPen=False, penSize=12, penColor=#ffc408, penStyle=inside
):
if imgPath is not None:
imgData = open(imgPath, rb).read()
image = QImage.fromData(imgData, imgType)
image.convertToFormat(QImage.Format_ARGB32)
imgsize = min(image.width(), image.height())
rect = QRect(
(image.width() - imgsize) / 2.0,
(image.height() - imgsize) / 2.0,
imgsize,
imgsize,
)
image = image.copy(rect)
out_img = QImage(imgsize, imgsize, QImage.Format_ARGB32)
out_img.fill(Qt.transparent)
brush = QBrush(image)
painter = QPainter(out_img)
painter.setBrush(brush)
painter.setPen(Qt.NoPen)
painter.setRenderHint(QPainter.Antialiasing, True)
penSizeHalf = penSize / 2.0
painter.drawEllipse(
0, 0,
imgsize, imgsize
)
painter.end()
pr = QWindow().devicePixelRatio()
Pixmap = QPixmap.fromImage(out_img)
Pixmap.setDevicePixelRatio(pr)
size *= pr
Pixmap = Pixmap.scaled(size, size, Qt.KeepAspectRatio, Qt.SmoothTransformation)
if noPen is False:
extendSize = size + (penSize * 2.0)
if penStyle == center:
out_img = QImage(extendSize, extendSize, QImage.Format_ARGB32)
out_img.fill(Qt.transparent)
brush = QBrush(Pixmap)
Paint = QPainter(out_img)
Paint.setBrush(brush)
Paint.setBrushOrigin(penSize, penSize)
Paint.setPen(QPen(QColor(penColor), penSize, Qt.SolidLine))
Paint.setRenderHint(QPainter.Antialiasing, True)
Paint.drawEllipse(
penSize, penSize,
extendSize - penSize * 2, extendSize - penSize * 2
)
Paint.end()
pr = QWindow().devicePixelRatio()
NewPixmap = QPixmap.fromImage(out_img)
NewPixmap.setDevicePixelRatio(pr)
return NewPixmap
elif penStyle == outside:
out_img = QImage(extendSize, extendSize, QImage.Format_ARGB32)
out_img.fill(Qt.transparent)
brush = QBrush(Pixmap)
Paint = QPainter(out_img)
Paint.setBrush(brush)
Paint.setBrushOrigin(penSize, penSize)
Paint.setPen(QPen(QColor(penColor), penSize, Qt.SolidLine))
Paint.setRenderHint(QPainter.Antialiasing, True)
Paint.drawEllipse(
penSizeHalf + 1, penSizeHalf + 1,
extendSize - penSize - 2, extendSize-penSize - 2
)
Paint.end()
pr = QWindow().devicePixelRatio()
NewPixmap = QPixmap.fromImage(out_img)
NewPixmap.setDevicePixelRatio(pr)
return NewPixmap
else:
Paint = QPainter(Pixmap)
Paint.setPen(QPen(QColor(penColor), penSize, Qt.SolidLine))
Paint.setRenderHint(QPainter.Antialiasing, True)
Paint.drawEllipse(
penSize / 2.0, penSize / 2.0,
size - penSize, size - penSize
)
Paint.end()
return Pixmap
class GUI(QMainWindow):
def __init__(self, parent=None, *args, **kwargs):
super(GUI, self).__init__(parent, *args, **kwargs)
self.setWindowTitle(MaskImage)
self.resize(300, 230)
# noPen=True
noPen = maskImage(
imgPath=rimage.png,
noPen=True
)
penInSide = maskImage(
imgPath=rimage.png,
)
penCenter = maskImage(
imgPath=rimage.png,
penStyle=center
)
penOutSide = maskImage(
imgPath=rimage.png,
penStyle=outside
)
images = [noPen, penInSide, penCenter, penOutSide]
imagesName = [noPen, penInSide, penCenter, penOutSide]
HLayout = QHBoxLayout()
for count, image in enumerate(images, 0):
imageLabel = QLabel()
imageLabel.setPixmap(images[count])
textLabel = QLabel(imagesName[count])
layout = QVBoxLayout()
layout.addWidget(textLabel, 0, Qt.AlignCenter)
layout.addWidget(imageLabel, 0, Qt.AlignCenter)
HLayout.addLayout(layout)
cw = QWidget()
cw.setLayout(HLayout)
self.setCentralWidget(cw)
gui = GUI(parent=parent)
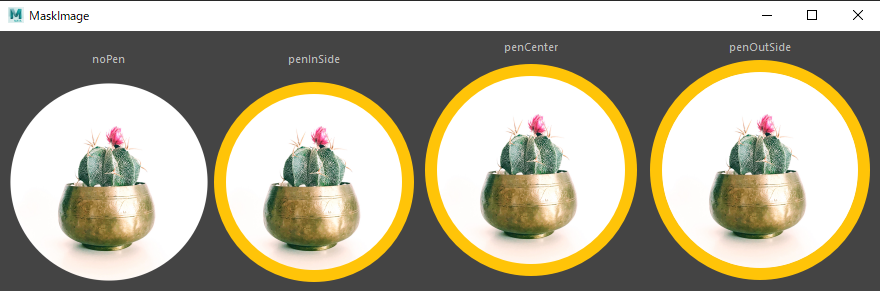
gui.show()上のコードを実行すると下のような画像のウインドウが表示されます
 104行目以降の
imgPath=r"image.png"はPC内にあるローカルの画像のPathを指定してください
※今回使用している画像はこちらからダウンロードしたものを使用しています
maskImage関数に定義している引数
| 引数名 | デフォルト | 説明 |
|---|---|---|
| imgPath | None | 画像のpathを指定します |
| imgData | None | 画像データを指定します |
| imgType | "png" | 画像データの拡張子を指定します |
| size | 200 | 出力するQPixmapのサイズを指定します |
| noPen | False | QPenを使用しない |
| penSize | 12 | QPenのサイズ |
| penColor | "#ffc408" | QPenのカラー |
| penStyle | "inside" | QPenを描画する場所を決めます inside-center-outside |
if imgPath is not None:
    imgData = open(imgPath, rb).read()
image = QImage.fromData(imgdata, imgtype)
image.convertToFormat(QImage.Format_ARGB32)
今回はマスクをかけたいため画像を読み込んだ際にアルファチャンネルを追加(32ビットARGBに変換)をします QImageには数多くの画像形式が使用でき、32ビットRGB形式(0xffRRGGBB)QImage.Format_RGB32や8ビットインデックスQImage.Format_Indexed8などがあります 詳しく知りたい方はenum QImage::Formatを読むといいです
imgsize = min(image.width(), image.height())
rect = QRect(
    (image.width() - imgsize) / 2,
    (image.height() - imgsize) / 2,
    imgsize,
    imgsize,
)
image = image.copy(rect)
正円の画像を作成するため、画像の短い長さを基に正方形に切り抜きます
out_img = QImage(imgsize, imgsize, QImage.Format_ARGB32)
out_img.fill(Qt.transparent)
先ほど切り抜いた画像と同じサイズのアルファチャンネルを持つ出力画像を作成して透明にします これをベースにQPixmapを作成していきます
# QBrushを作成
brush = QBrush(image)
# 出力画像にペイント
painter = QPainter(out_img)
# 先ほど定義したbrushを基に塗りつぶし
painter.setBrush(brush)
# アウトラインを使用しない
painter.setPen(Qt.NoPen)
# 指定されたレンダリングヒントをペインタに設定しアンチエイリアシングをかける
painter.setRenderHint(QPainter.Antialiasing, True)
painter.drawEllipse(
    0, 0,
    imgsize, imgsize
)
painter.end()
QBrushを作成して、元の画像を円に塗って出力画像に書いていきます
pr = QWindow().devicePixelRatio()
Pixmap = QPixmap.fromImage(out_img)
Pixmap.setDevicePixelRatio(pr)
size *= pr
Pixmap = Pixmap.scaled(size, size, Qt.KeepAspectRatio, Qt.SmoothTransformation)
ピックスマップのデバイスピクセル比を設定し、SizeにdevicePixelRatioを代入演算子した結果を基にQPixmap.scaledをかけてQPixmapを作成します この後はペンの有効無効化によって出力結果を分岐しますがペンが無効の場合はこのQPixmapをそのまま出力します
    if noPen is False:
        penSizeHalf = penSize / 2.0
        extendSize = size + (penSize * 2.0)
        if penOutSide is True:
        if penStyle == center:
        elif penStyle == outside:
        elif penStyle == inside:
            Paint = QPainter(Pixmap)
            Paint.setPen(QPen(QColor(penColor), penSize, Qt.SolidLine))
            Paint.setRenderHint(QPainter.Antialiasing, True)
            Paint.drawEllipse(
                penSize / 2.0, penSize / 2.0,
                size - penSize, size - penSize
            )
            Paint.end()
ペンが有効の場合はpenStyleで出力結果を分岐しています 特に指定がない場合は画像の丸の中に縁(QPen)を描画するため、QPixmapにQPainterを使用してsetPenでQPen追加し、drawEllipseで縁を描画した後、QPixmapを出力します
    if noPen is False:
        penSizeHalf = penSize / 2.0
        extendSize = size + (penSize * 2.0)
        if penStyle == center:
        elif penStyle == outside:
            out_img = QImage(extendSize, extendSize, QImage.Format_ARGB32)
            out_img.fill(Qt.transparent)
            brush = QBrush(Pixmap)
            Paint = QPainter(out_img)
            Paint.setBrush(brush)
            Paint.setBrushOrigin(penSize, penSize)

            Paint.setPen(QPen(QColor(penColor), penSize, Qt.SolidLine))
            Paint.setRenderHint(QPainter.Antialiasing, True)
            Paint.drawEllipse(
                penSizeHalf + 1, penSizeHalf + 1,
                extendSize -  penSize - 2, extendSize-penSize - 2
            )
            Paint.end()

            pr = QWindow().devicePixelRatio()
            NewPixmap = QPixmap.fromImage(out_img)
            NewPixmap.setDevicePixelRatio(pr)
            return NewPixmap
        elif penStyle == inside:
penStyleがoutsideの場合、画像の外側に縁(QPen)を描画を行いますので今のQPixmapのサイズでは小さいため、 縁のサイズ(penSize)分、大きくする必要があります しかし、スケールをかけてしまうとせっかく用意した円に切り取った画像が伸びてしまうため新しいQImageを用意します
参考例では横縦200pxのQPixmapを出力しますが縁分大きくした横縦224pxのQPixmapを用意します
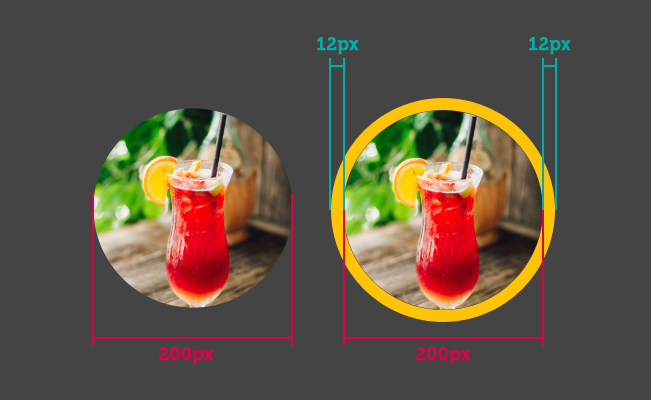 そしてQBrushに円に切り取った画像を設定し、setBrushOriginで配置場所をQPenのサイズ移動させ、setPenでQPen追加し、drawEllipseで外枠を描画したQPixmapを出力します
            Paint.drawEllipse(
                penSizeHalf, penSizeHalf,
                extendSize -  penSize, extendSize-penSize
            )
QPenの描画は下の画像のような描画方法ですのでdrawEllipseを描画おこなうポイントはPenSizeの半分のサイズの位置から描画する必要がありますですので上のようなコードで試すと
QPenに関して詳しくはQPen Classをお読みください
 下の画像のようにアンチエイリアシング分バックグラウンドカラーが描画されてしまいます
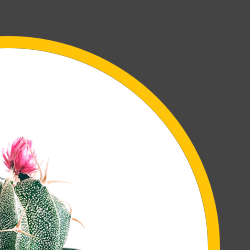 そのため、サンプルのコードでは1px分、縁の半径を小さくしています
Paint.drawEllipse(
    penSizeHalf + 1, penSizeHalf + 1,
    extendSize -  penSize - 2, extendSize-penSize - 2
)
半径1px分ですので直径では2px分小さくなります
    if noPen is False:
        penSizeHalf = penSize / 2.0
        extendSize = size + (penSize * 2.0)
        if penStyle == center:
            out_img = QImage(extendSize, extendSize, QImage.Format_ARGB32)
            out_img.fill(Qt.transparent)
            brush = QBrush(Pixmap)
            Paint = QPainter(out_img)
            Paint.setBrush(brush)
            Paint.setBrushOrigin(penSize, penSize)

            Paint.setPen(QPen(QColor(penColor), penSize, Qt.SolidLine))
            Paint.setRenderHint(QPainter.Antialiasing, True)
            Paint.drawEllipse(
                penSize, penSize,
                extendSize - penSize * 2, extendSize - penSize * 2
            )
            Paint.end()

            pr = QWindow().devicePixelRatio()
            NewPixmap = QPixmap.fromImage(out_img)
            NewPixmap.setDevicePixelRatio(pr)
            return NewPixmap
        elif penStyle == outside:
        elif penStyle == inside:
penStyleがcenterの場合は画像の外側と内側に描画するためQPenのサイズの半分だけ画像を大きくし、先ほどと同じことを行い出力していますが こちらの場合では画像の上に描画しているため小さくする必要がないのでPenSizeそのまま行っています
こういった関数を事前に用意しておくと ちょっとしたところにユーザーアイコンほしいとか、丸ボタンに画像つけたいとかいうのにすぐ使用できるのでぜひ皆さんもご活用ください